User Guide
Welcome to RC4HDB User Guide!
If you are a Residential College 4 (RC4) Housing Management staff, or someone who wants to find out more about what Residential College 4 Housing Database (RC4HDB) can do for you, you are at the right place!
In this user guide, you will find step-by-step instructions on how you can install RC4HDB, as well as how you can use RC4HDB to its fullest potential.
If you are looking to expand on our project, check out our Developer Guide too!
Table of Contents
- Introduction to RC4HDB
- Using this guide
- Quick start
- Command guide
- FAQ
- Glossary
- Authors
- Command Summary
Introduction to RC4HDB
RC4HDB is a desktop application which streamlines the daily workflow of RC4 housing management staff, by providing specialised features which solve their resident and venue management needs.
As a potential RC4HDB user, you are expected to be:
- A RC4 housing management staff
- Experienced with administrative work
- Comfortable using a keyboard
Broadly, RC4HDB provides users with the ability to:
- View and manage resident data
- View and manage venues and any bookings
- Keep and manage multiple data files
- Easily switch over to RC4HDB by importing old data from CSV files
Using this guide
This user guide contains all the information that you will need to know as a user of RC4HDB. We hope that it will serve you well in mastering RC4HDB!
If you are a new user, the necessary knowledge for you to get started can be found here. As you read on, you will find plenty of examples to help you familiarise with the features.
If you are an experienced user, a command summary is also provided, so you don’t have to memorise our commands.
Before exploring the user guide, you should familiarise yourself with the following symbols.
Quick start
Here is a quick guide on how to get a working copy of RC4HDB on your computer.
1. Setup
Ensure you have Java 11 or above installed on your Computer.
2. Install
Visit this link. Click on rc4hdb.jar to download the latest rc4hdb.jar. Move the rc4hdb.jar file to the folder you want to use as the home folder for RC4HDB. The home folder is the folder from which the application will run, save data to, and retrieve data from.
3. Running RC4HDB
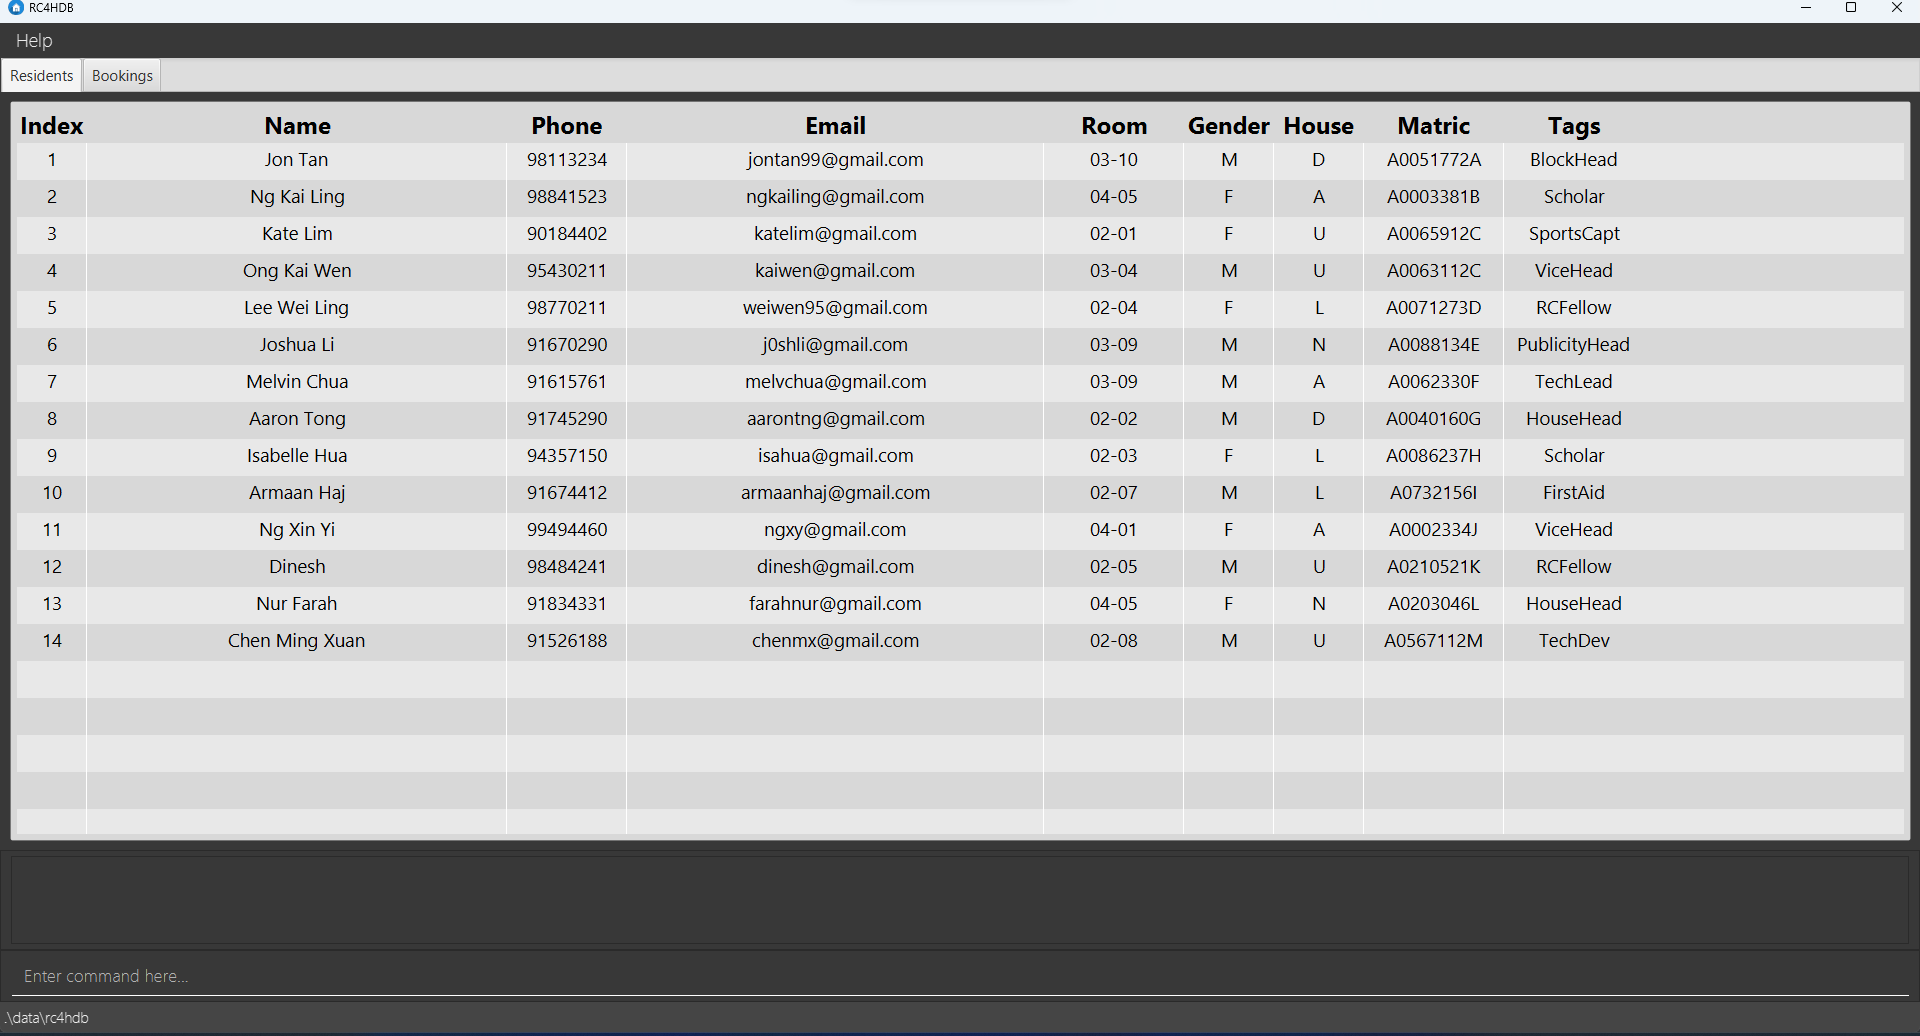
Double-click the file to start the app. The Graphical User Interface (GUI) similar to the one shown below should appear in a few seconds.
rc4hdb.jar for the first time, several files were created. Do not
delete the folder called data as this would cause all your data to be deleted!
4. Try it out!
Try typing help into the command box where it says “Enter Command here…” and pressing the Enter/Return key on your keyboard to execute it! This command will open a help window which shows you a quick summary of our available commands.
For more details on commands, refer to our command guide below.
Command Guide
Below shows a breakdown of how the commands in RC4HDB are structured. Don’t be afraid that you may have typed a command incorrectly as RC4HDB will inform you in the event that this happens!
-
Words in
UPPER_CASEare compulsory parameters and must be entered by you.
Parameters are texts you enter to tell RC4HDB the information necessary for the command to work.e.g. when using the
addcommand,NAMEis a parameter which you must enter. Thus, the command format is as such:add n/NAME. To add a resident named “John Doe”, you can then enteradd n/John Doe. -
Items in square brackets are optional.
e.g.n/NAME [t/TAG]can be used asn/John Doe t/friendor asn/John Doe. -
Items with
… after them can be used multiple times. This also includes 0 times.
e.g.[t/TAG]…can be used ast/friend,t/friend t/familyetc. -
Parameters can be in any order.
e.g. if the command specifiesn/NAME p/PHONE_NUMBER,p/PHONE_NUMBER n/NAMEis also acceptable. -
If a parameter is expected only once in the command but you specified it multiple times, only the last occurrence of the parameter will be taken, unless otherwise specified.
e.g. if you specifyp/12341234 p/56785678, onlyp/56785678will be taken. -
Irrelevant parameters for commands that do not take in parameters (such as
help,list,exitandclear) will be ignored.
e.g. if the command specifieshelp 123, it will be interpreted ashelp.
Getting Help
Viewing the command summary from the user guide can be a hassle to some. As an alternative, we have incorporated it directly into RC4HDB.
Viewing help : help
Opens a window with a summary table of all commands, and examples of its usage. A link to this user guide is also included for your convenience.
Format: help
F1 key on your keyboard to
open the Help Window immediately! You can also press the Esc key on your keyboard to close the Help Window
if it is open. Modifying Resident Data
In order to maintain the database, we have provided several basic commands such as add, edit, delete and clear
to help you modify resident data within RC4HDB.
Note:
- RC4HDB does not allow duplicate residents to exist within the database, as a measure to prevent unintentional adding of duplicate residents.
- Two residents are considered duplicates of each other if any of the following are same:
- Matriculation number
- Phone number
- Room
Adding a resident : add
Adds a resident. Does not allow any duplicate residents to be added.
Format: add n/NAME p/PHONE_NUMBER e/EMAIL r/FLOOR-UNIT g/GENDER h/HOUSE m/MATRIC_NUMBER [t/TAG]…
Examples:
-
add n/John Doe p/98765432 e/johnDoe@gmail.com r/5-1 g/M h/D m/A9876543Badds a resident named John Doe, with relevant personal and student information. -
add n/Betsy Crowe t/friend e/betsycrowe@example.com r/2-3 p/12345678 m/A3456789B g/F h/Aadds a resident named Betsy Crowe, with relevant personal and student information.
Editing an existing resident : edit
Edits the data of an existing resident. Does not allow any duplicate residents to be created due to the editing of a resident.
Format: edit INDEX [n/NAME] [p/PHONE_NUMBER] [e/EMAIL] [r/FLOOR-UNIT] [g/GENDER] [h/HOUSE] [m/MATRIC_NUMBER] [t/TAG]…
- Edits the resident at the specified
INDEX. - The index refers to the index number shown in the displayed residents list.
- The index must be a positive integer: 1, 2, 3, …
- At least one of the optional parameters must be provided.
- Existing values will be updated to the input values.
- When editing tags, the existing tags of the resident will be removed i.e adding of tags is not cumulative.
- You can remove all the resident’s tags by typing
t/without specifying any tags after it.
Examples:
-
edit 1 p/91234567 r/5-8Edits the phone number, room number of the 1st resident to be91234567, and5-8respectively. -
edit 2 n/Betsy Crower t/Edits the name of the 2nd resident to beBetsy Crowerand clears all existing tags.
Deleting a resident : delete
Deletes the specified resident.
Format: delete INDEX
- Deletes the resident at the specified
INDEX. - The index refers to the index number shown in the displayed resident list.
- The index must be a positive integer: 1, 2, 3, …
Examples:
-
listfollowed bydelete 2deletes the 2nd resident in the database. -
find Betsyfollowed bydelete 1deletes the 1st resident in the results of thefindcommand.
Deleting multiple residents : remove
Deletes residents whose fields match the input keywords.
Format: remove /SPECIFIER KEY/VALUE [ADDITIONAL_KEYS/ADDITIONAL_VALUES]
- A specifier is required in order for the command to work. If not, it is an invalid command format.
- Currently, only two specifiers are supported:
-
/allreturns a resident if it fulfills all of the specified keywords. -
/anyreturns a resident if it fulfills any of the specified keywords.
-
- Repeated keys are not permitted for both specifiers, e.g.
remove /all h/D h/Awill not work. - However, tags can be repeated in the command e.g.
remove /all t/exchange t/fresher. - Valid keys are those included here, and any additional tags.
Examples:
-
remove /all h/D g/Mdeletes residents who are in Draco house, and are Male. -
remove /any h/D h/Adeletes residents belonging to eitherDracoorAquilahouse.
Clearing all entries : clear
Deletes all residents from RC4HDB.
Format: clear
Format for resident fields
n/NAME
- Whitespaces are allowed i.e.
Michael B. Jordanis allowed.
p/PHONE_NUMBER
- Must be an 8-digit non-negative integer.
e/EMAIL
- Must follow the formatting for all standard emails i.e.
Example@email.comis accepted. - Can be both valid or invalid emails.
r/FLOOR-UNIT
- The floor number and unit number must be separated by a hyphen.
- Both floor and unit number must be a positive integer less than 30 i.e.
5-8is valid,0-8is invalid,31-1is invalid.
g/GENDER
-
MorF. - Not case-sensitive i.e.
mandfare also valid.
h/HOUSE
- Represents the RC4 house that the resident is allocated to.
- Must be either
A,D,L,N,U. -
Astands for Aquila,Dstands for Draco,Lfor Leo,Nfor Noctua,Ufor Ursa. - Not case-sensitive i.e.
a,d,l,nanduare also valid.
m/MATRIC_NUMBER
- Must be an
A, followed by a 7-digit non-negative integer and an alphabet. i.e.A0123456A. - Not case-sensitive i.e.
a0123456b,A0123456banda0123456Bare also valid.
t/TAG
- Can be used to add any other miscellaneous information that the resident can be identified by.
- Can only contain alphanumeric characters, whitespaces are not allowed.
- Optional. A resident can have any number of tags, including 0.
- When editing tags, the existing tags of the resident will be removed i.e adding of tags is not cumulative.
- You can remove all the resident’s tags by typing
t/without specifying any tags after it. - Multiple tags can be added to the command using multiple keywords e.g
t/president t/exchange.
Viewing Residents
You might find yourself overloaded with information. These commands can help you hide resident fields from view, find specific residents, or search for residents whose fields match a specific keyword. By de-cluttering your screen, these commands help you to focus only on the information you need!
Listing all residents : list
Lists all the residents in the RC4HDB database with all fields included in the view. If the table view is showing a filtered portion of the residents,
calling list will restore and display the full list of residents.
Format: list
- Any input entered directly after
listwill be ignored. i.e.list asd,asdwill be ignored. - Resets the columns in the table to the default view with all columns visible.
Showing only some columns : showonly
Shows only the specified columns from the current table view.
Note:
- You can only use
showonlyon existing columns in the current table view, and - The
showonlycommand does not modify the list of residents being displayed. Filtered residents stay filtered.
Format: showonly LETTER [MORE_LETTERS]
- Valid inputs include
i n p e r g h m t(case-insensitive), which correspond to the first letter of each field in the table.- This should not be confused with the
n/orp/prefixes used inaddorfilter.
- This should not be confused with the
- Letters must be separated by a single whitespace.
- The order of each letter does not matter.
- Duplicate letters are ignored.
- There needs to be at least one column shown in the table at all times.
- You can always use
resetto restore the full table view!
Calling filter /all g/M on a full table, followed by showonly n g h will produce the following result:
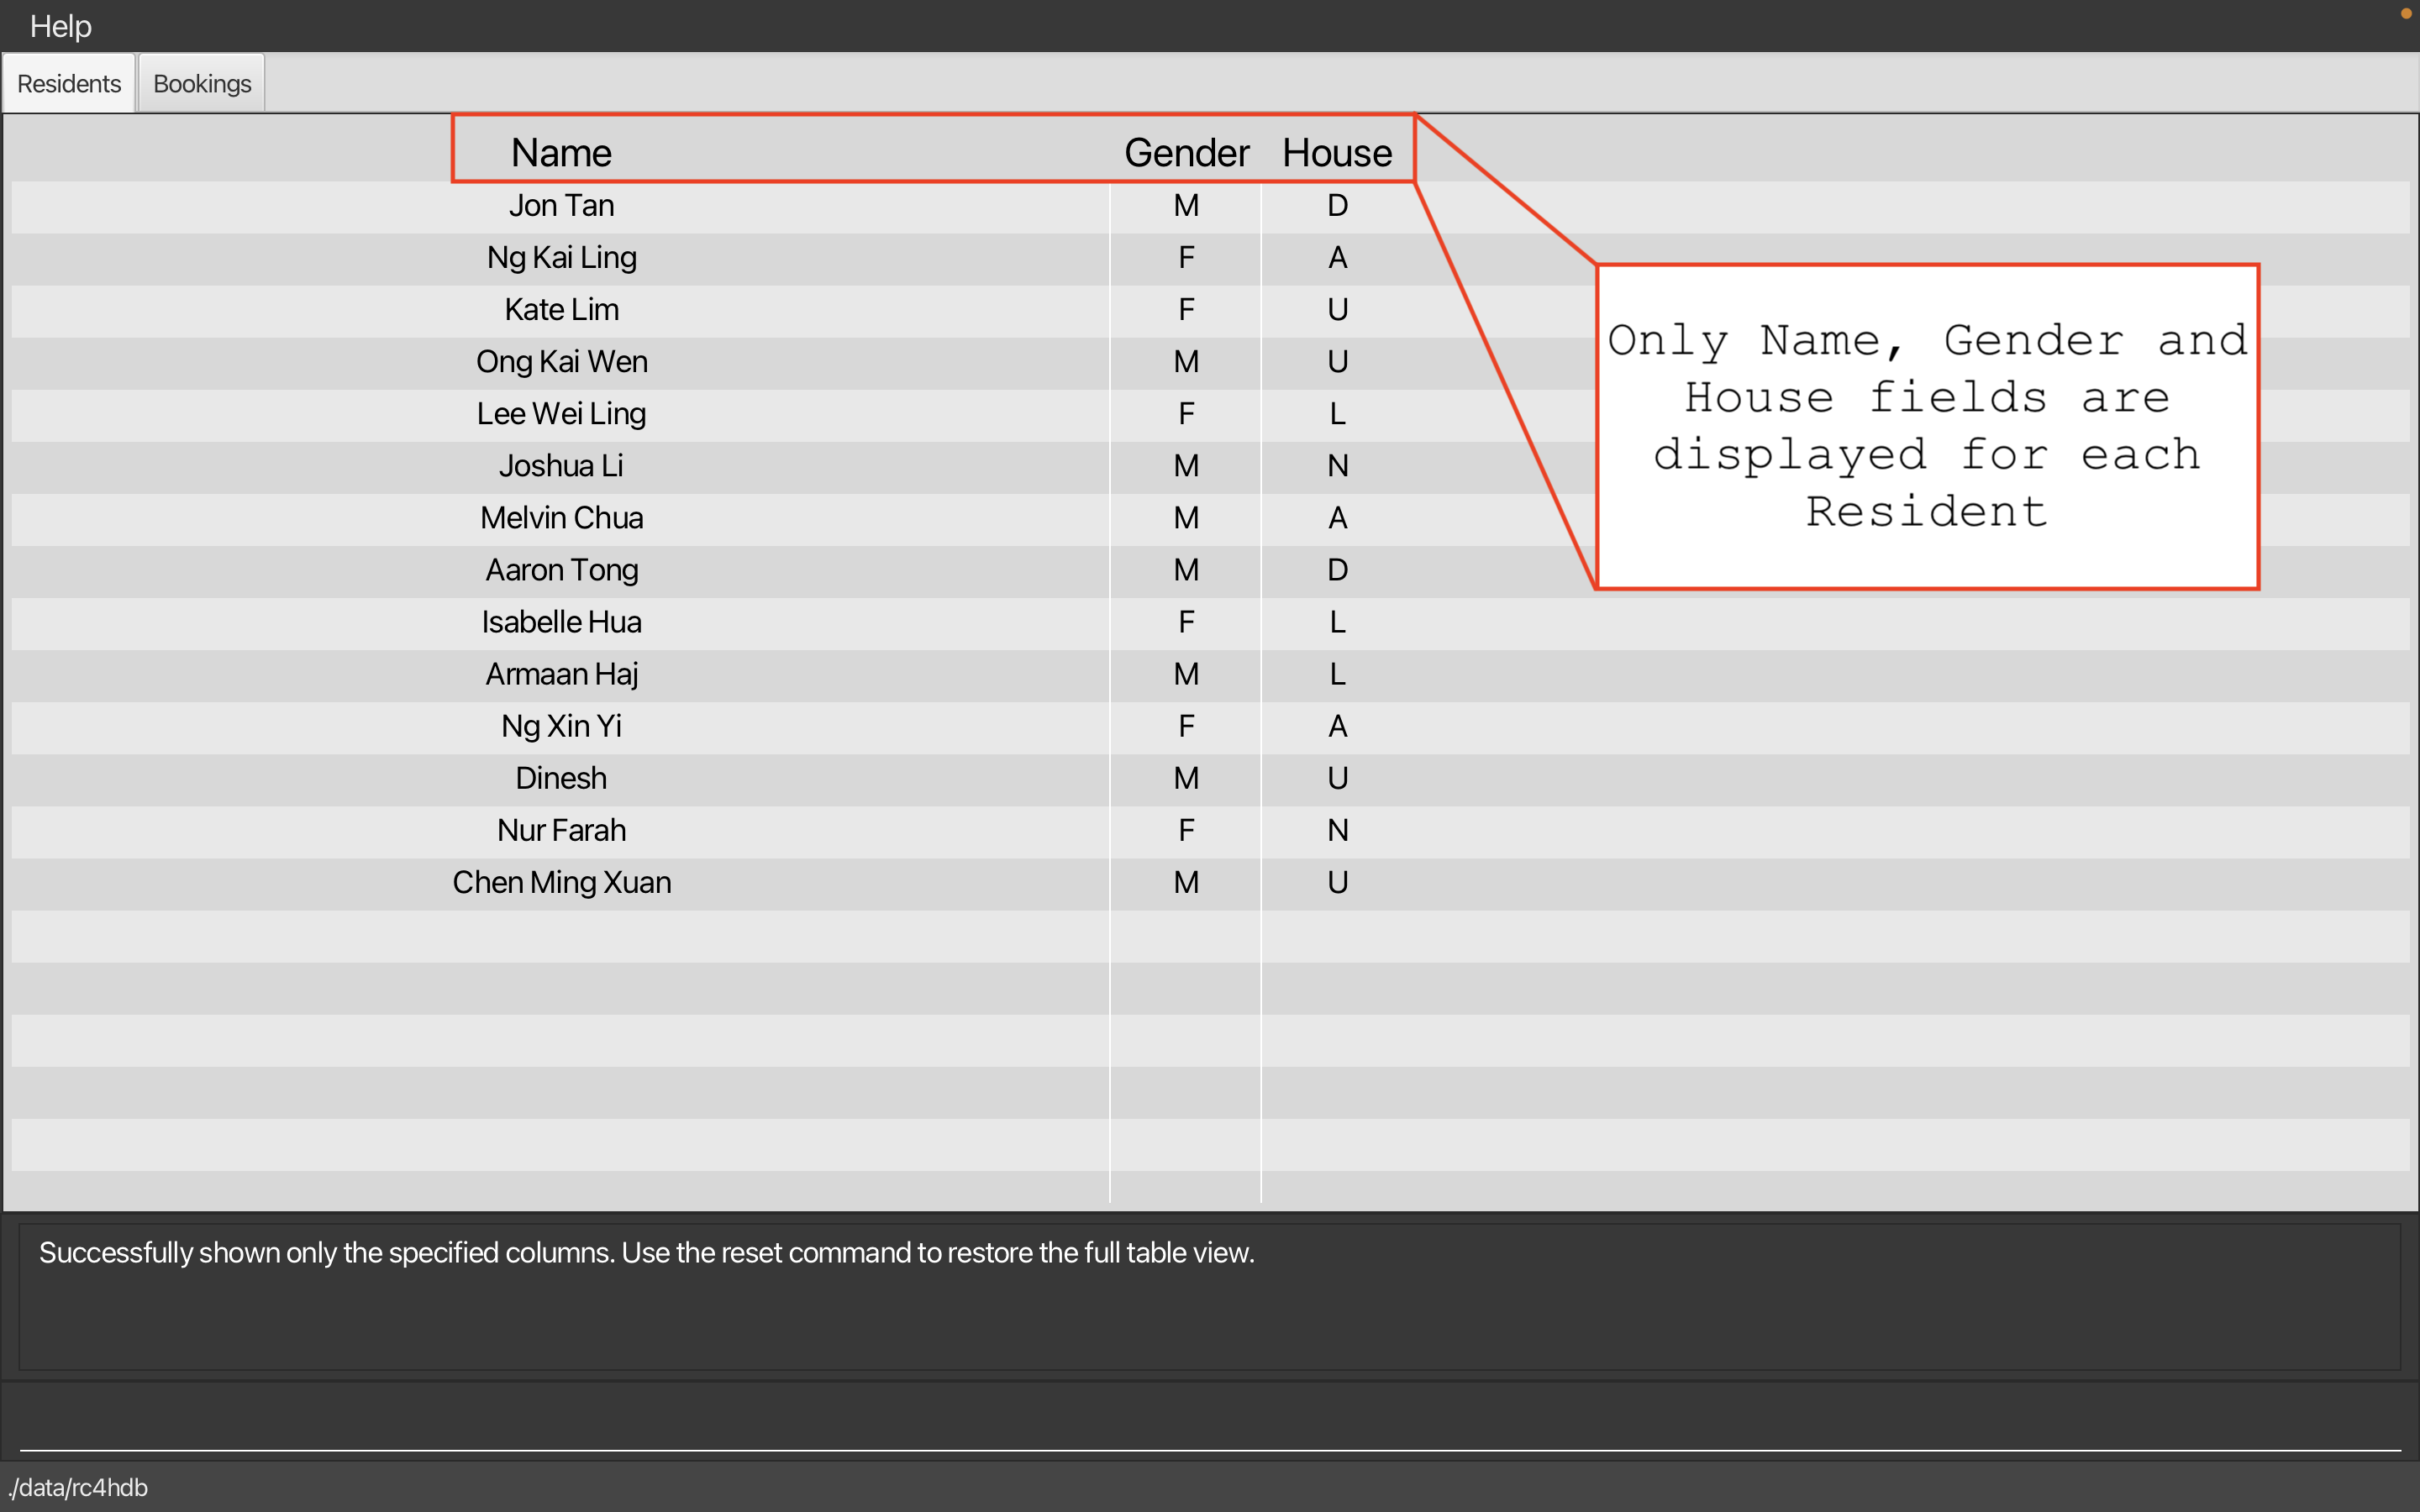
As you can see,showonly displays only the specified columns, and does not change the filtered list of residents.
The following examples are to be performed one after the other:
-
showonly n g hon a full table returns a table with only the name, gender and house columns shown, as above. - Using
showonly r p eon the table from point 1 is invalid as the room, phone and email columns are not present in the current table. - However, using
showonly n gon said table is valid, and will return a table with only the name and gender columns shown.
Hiding only some columns : hideonly
Hides only the specified columns from the current table view.
Note:
- You can only use
hideonlyon existing columns in the current table view, and - The
hideonlycommand does not modify the list of residents being displayed. Residents found usingfindstay displayed in the table.
(Click here to learn about find)
Format: hideonly LETTER [MORE_LETTERS]
- Valid inputs include
i n p e r g h m t(case-insensitive), which correspond to the first letter of each field in the table.- This should not be confused with the
n/orp/prefixes used ineditorfilter.
- This should not be confused with the
- Letters must be separated by a single whitespace.
- The order of each letter does not matter.
- Duplicate letters are ignored.
- There needs to be at least one column shown in the table at all times.
- You can always use
resetto restore the full table view!
Calling hideonly i r p e m t on a full table will produce the following result:

The following examples are to be performed one after the other:
-
hideonly i r p e m ton a full table returns a table with only the index, room, phone, email, matric and tags columns hidden.- In other words, we see a table with only the name, gender and house columns shown, as above.
- Using
hideonly r eon the table from point 1 is invalid as the room and email columns are not present in the current table. - However, using
hideonly non said table is valid, and will return a table with only the gender and house columns shown, as the name column has been hidden.
Resetting hidden columns : reset
Resets the columns in the table to the full view with all columns visible.
Format: reset
- Any input entered directly after
resetwill be ignored. i.e.reset asd,asdwill be ignored. - This command is different from the
listcommand in that it does not affect the list of residents being displayed.- However, both commands cause the full set of resident fields (i.e. the full set of columns) to be displayed in the table.
Locating residents by name : find
Finds residents whose names contain any of the given keywords.
Format: find KEYWORD [ADDITIONAL_NAMES]
- The search is case-insensitive. e.g
peter pangwill matchPeter Pang. - Only the name is searched.
- The order of the keywords does not matter.
- Full and partial words will be matched e.g.
Navwill matchNavarun. - Residents matching at least one keyword will be returned, e.g.
Quek Weiwill returnQuek Xiang,Jun Wei.
Calling find el an on our sample data will produce the following result:
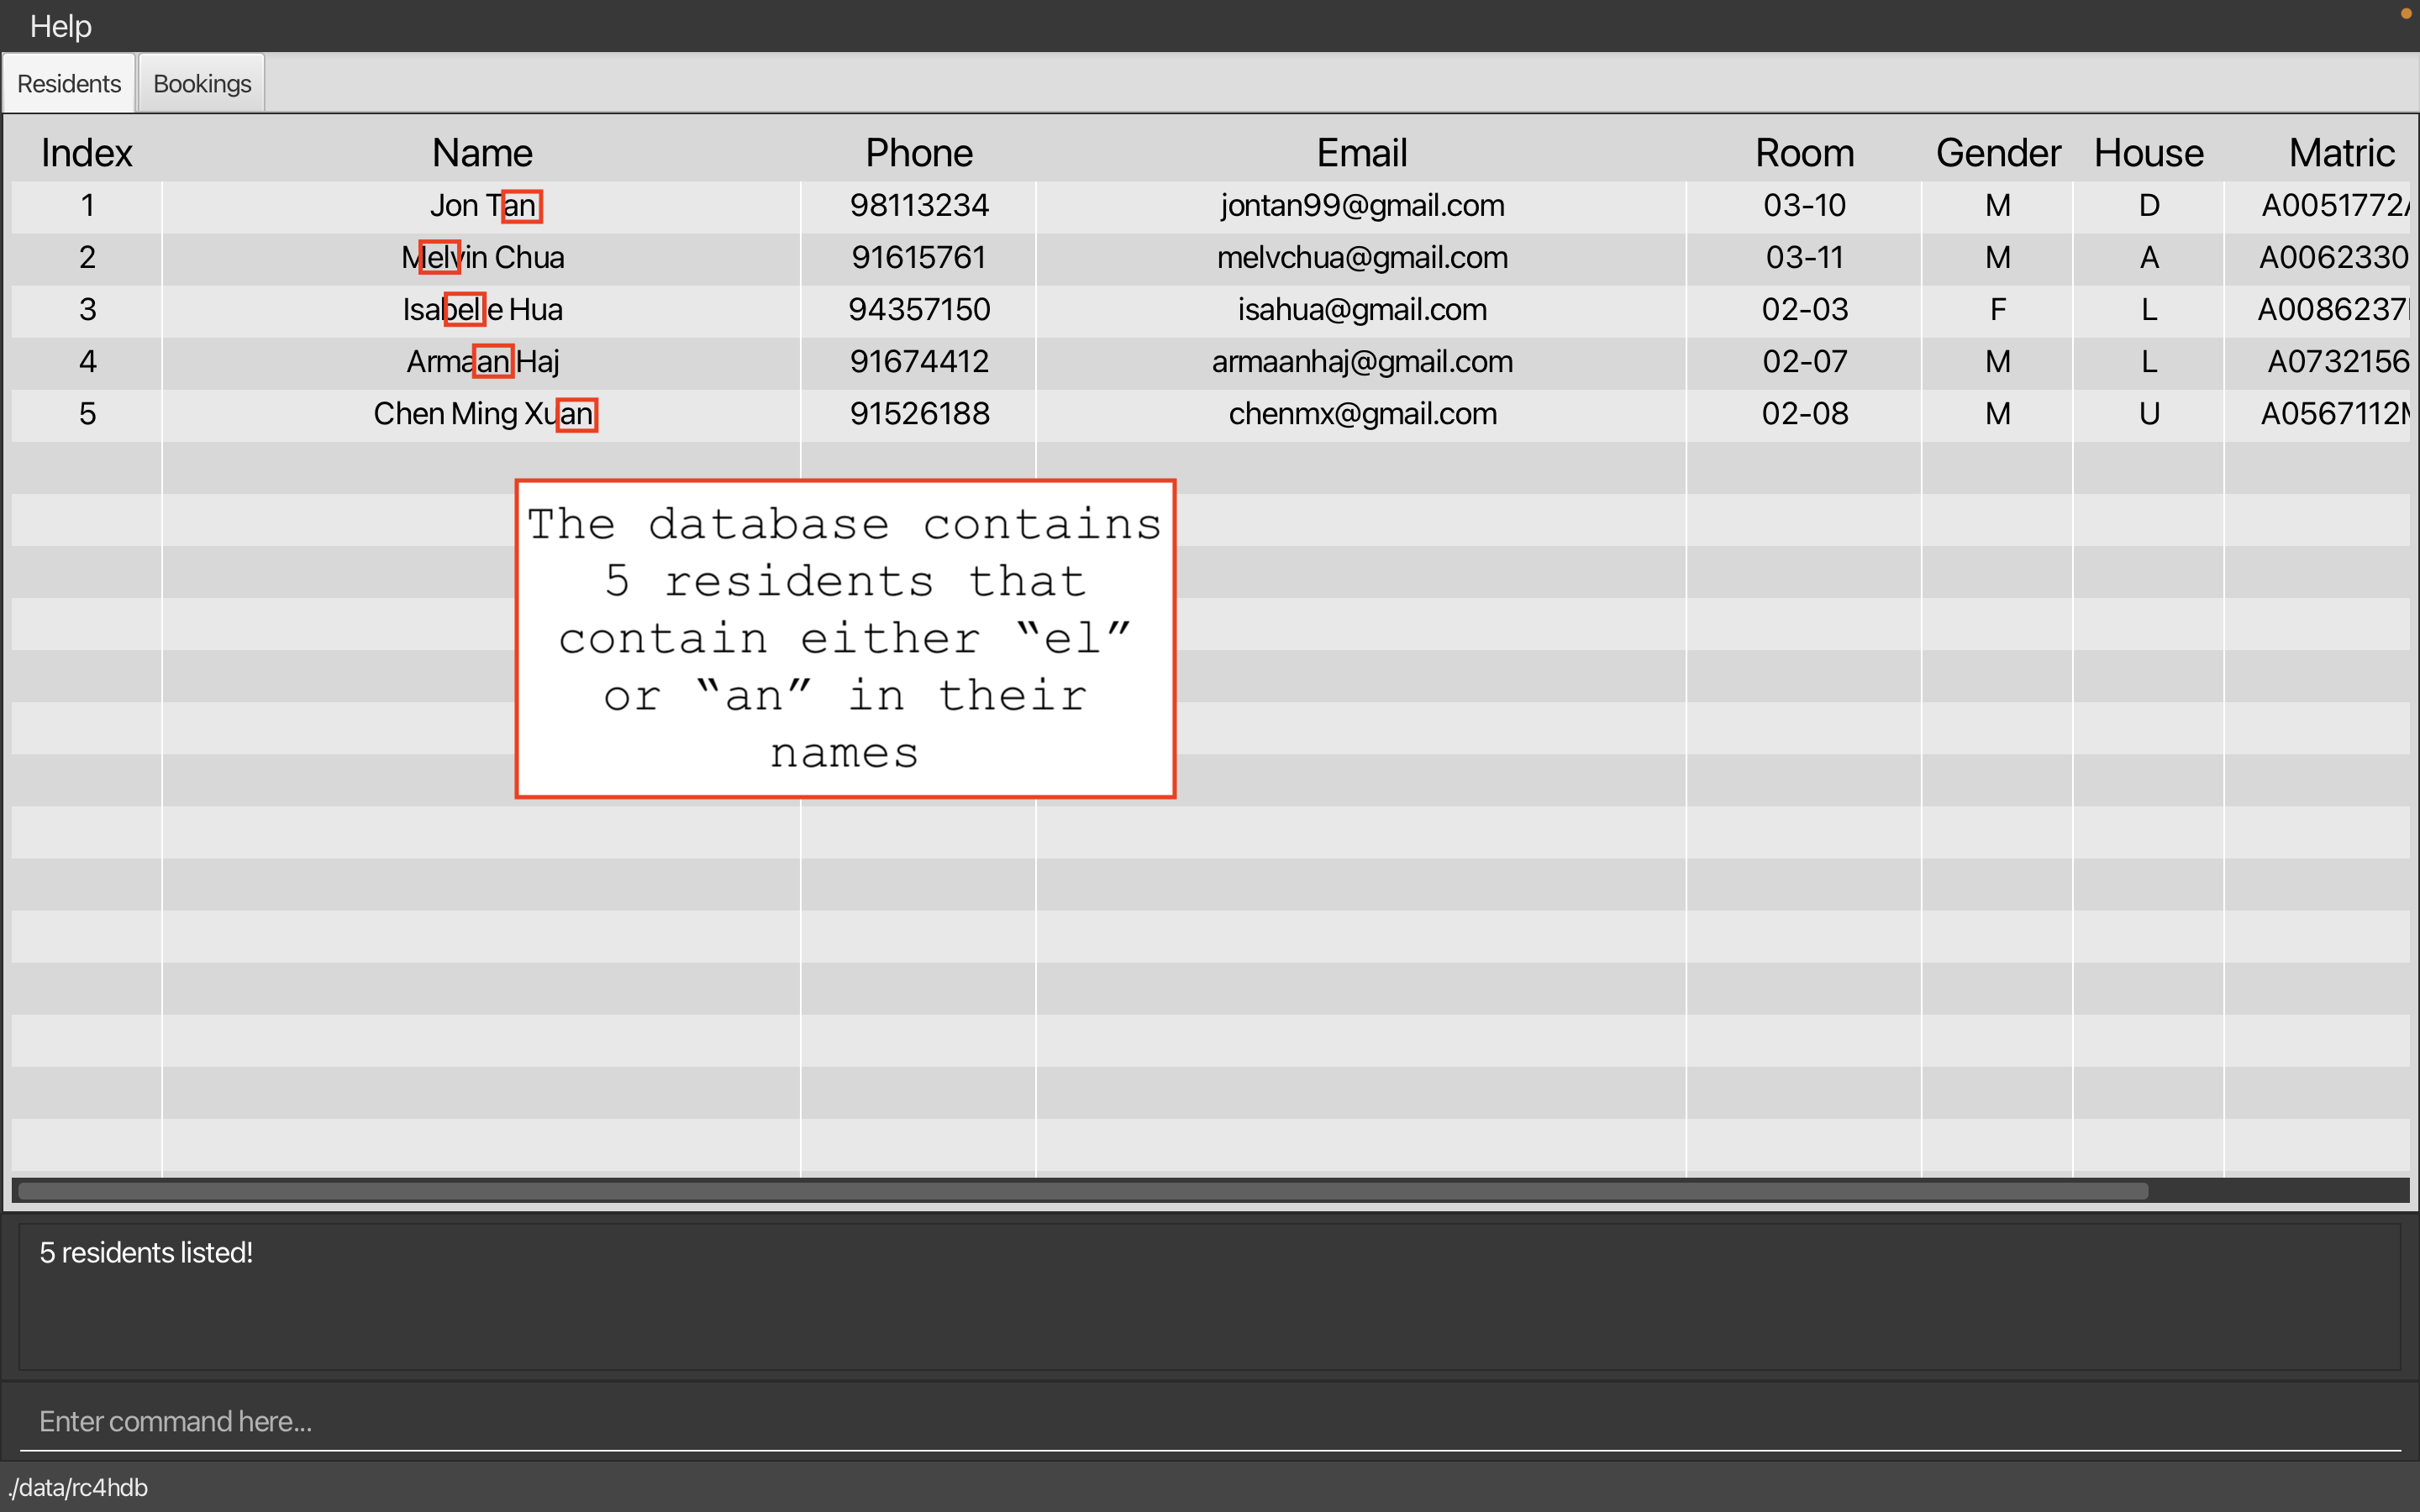
As you can see, the residents with names containing either “el” or “an” are listed as the result of the find command.
Examples:
-
find shawnreturnsShawn LeeandShawn Ng -
find elizabeth davidreturnsElizabeth Ong,David Lee -
find char lireturnsCharmaine Yee,William Li
Filtering residents by field : filter
Shows a list of residents whose fields match the input keywords.
Format: filter /SPECIFIER KEY/VALUE [ADDITIONAL_KEYS/ADDITIONAL_VALUES]
- A specifier is required in order for the command to work. If not, it is an invalid command format.
- Only one specifier can be entered in a command.
- Currently, only two specifiers are supported:
-
/allreturns a resident if it fulfills all of the specified keywords. -
/anyreturns a resident if it fulfills any of the specified keywords.
-
- Repeated keys are not permitted for both specifiers, e.g.
filter /all h/D h/Awill not work. - Tags can be repeated in the command e.g.
filter /all t/exhange t/fresher. - Valid keys are those included here, and any additional tags.
Examples:
-
filter /all h/D g/Mreturns residents who are in Draco house, and are Male. -
filter /any h/D h/Areturns residents belonging to eitherDracoorAquilahouse. -
filter g/Mreturns residents who are male.
File Management
To provide a streamlined way of managing RC4 related data, RC4HDB provides users with the ability to organise their files using our file management commands.
RC4HDB currently supports the following file management functionalities:
- Creation of new data folders.
- Deletion of old data folders.
- Switching between different data folders.
- Importing of resident data from a CSV file.
Finding your data
RC4HDB stores your data in a main data folder named data, which can be found in the same folder where you placed the rc4hdb.jar file. Within the main data folder, resident and venue data is stored in sub data folder(s). The default data folder that all copies of RC4HDB start out with is the rc4hdb folder.
Inside your data folder, there should be two JSON files, resident_data.json and venue_data.json, which store your resident and venue data respectively.
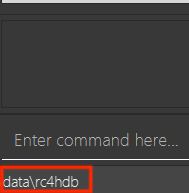
To find out which sub data folder is currently open, look at the footer, that can be found at the bottom of the application interface as shown in the image below, where the current sub data folder that is open is rc4hdb.
Saving your data
RC4HDB saves your data after every command. There is no need to save manually.
Creating a new data folder : file create
Creates a new sub folder with the specified FOLDER_NAME, if such a folder does not exist. After creating a new folder, RC4HDB will then create fresh data file to store venue and resident data.
Format: file create FOLDER_NAME
- Does not create a new folder if the folder already exists.
Examples:
-
file create rc4_data_2022will create a new folder namedrc4_data_2022with fresh data resident and venue data files.
Deleting an existing data folder : file delete
Deletes a sub data folders.
Format: file delete FOLDER_NAME
- Does not delete the folder if it is currently open. You must switch to a different folder before deleting the previously open folder.
Examples:
-
file delete rc4_data_2022will delete therc4_data_2022folder, along with the resident and venue data files inside the folder.
Switching to a different data folder : file switch
Switches between different sub data folders.
Format: file switch FOLDER_NAME
- Does not create a new folder if the specified folder does not exist.
Examples:
-
file switch rc4_data_2022will switch the currently used folder torc4_data_2022.
Importing resident data from CSV file : file import
Imports data from CSV files. In order for RC4HDB to find your files, place them in the main data folder.
Format: file import FILE_NAME
Examples:
-
file import residentswill import the data fromresidents.csvinto a new resident data file which can be found in theresidentssub data folder in the main data folder.
File Command Format:
- All file commands have a
FOLDER_NAMEorFILE_NAMEfield depending on the command that is being used. -
FOLDER_NAMEsignifies the name of the sub data folder that is being used. -
FILE_NAMErefers to the CSV file to be targeted. - Do not include any file types in the
FOLDER_NAMEorFILE_NAME. A file type is the description that comes after the.in a file. For example, The file name of the fileresidents.csvis justresidents. - The following symbols are not to be used in
FOLDER_NAMEorFILE_NAME:- Empty spaces
-
.dots -
/forward slashes -
\backslashes
Examples:
-
rc4_data_2022is a validFOLDER_NAME/FILE_NAME. -
rc4_data_2022.jsonis an invalidFOLDER_NAME/FILE_NAMEdue to the inclusion of the file type,.json. - The following are invalid
FOLDER_NAME/FILE_NAMEdue to the inclusion of restricted symbols.-
rc4 data 2022has empty spaces. -
rc4.data.2022has dots. -
rc4/data/2022has forward slashes. -
rc4\data\2022has backslashes.
-
CSV file format
Format:
- For clarity, the table column headers have been included. DO NOT include them in your CSV file.
- All fields are mandatory, apart from
TAGS, where users have to input aNIL, which is not case-sensitive.
| NAME | PHONE_NUMBER | FLOOR-UNIT | GENDER | HOUSE | MATRIC_NUMBER | TAGS | |
|---|---|---|---|---|---|---|---|
| John Doe | 91234567 | johnDoe@example.com | 5-8 | M | D | A9876543B | NIL |
| Maggie Smith | 98765432 | maggieSmith@example.com | 4-1 | F | A | A3456789B | WelfareHead Captain |
Venue Management
Along with the ability to manage residents, we have also provided you with the ability to manage the venues in RC4HDB through a booking system. This will allow you to add, remove available venues, as well as add, remove bookings for those venues.
Viewing the bookings
To view the bookings, you will have to click on the tab labelled as bookings.
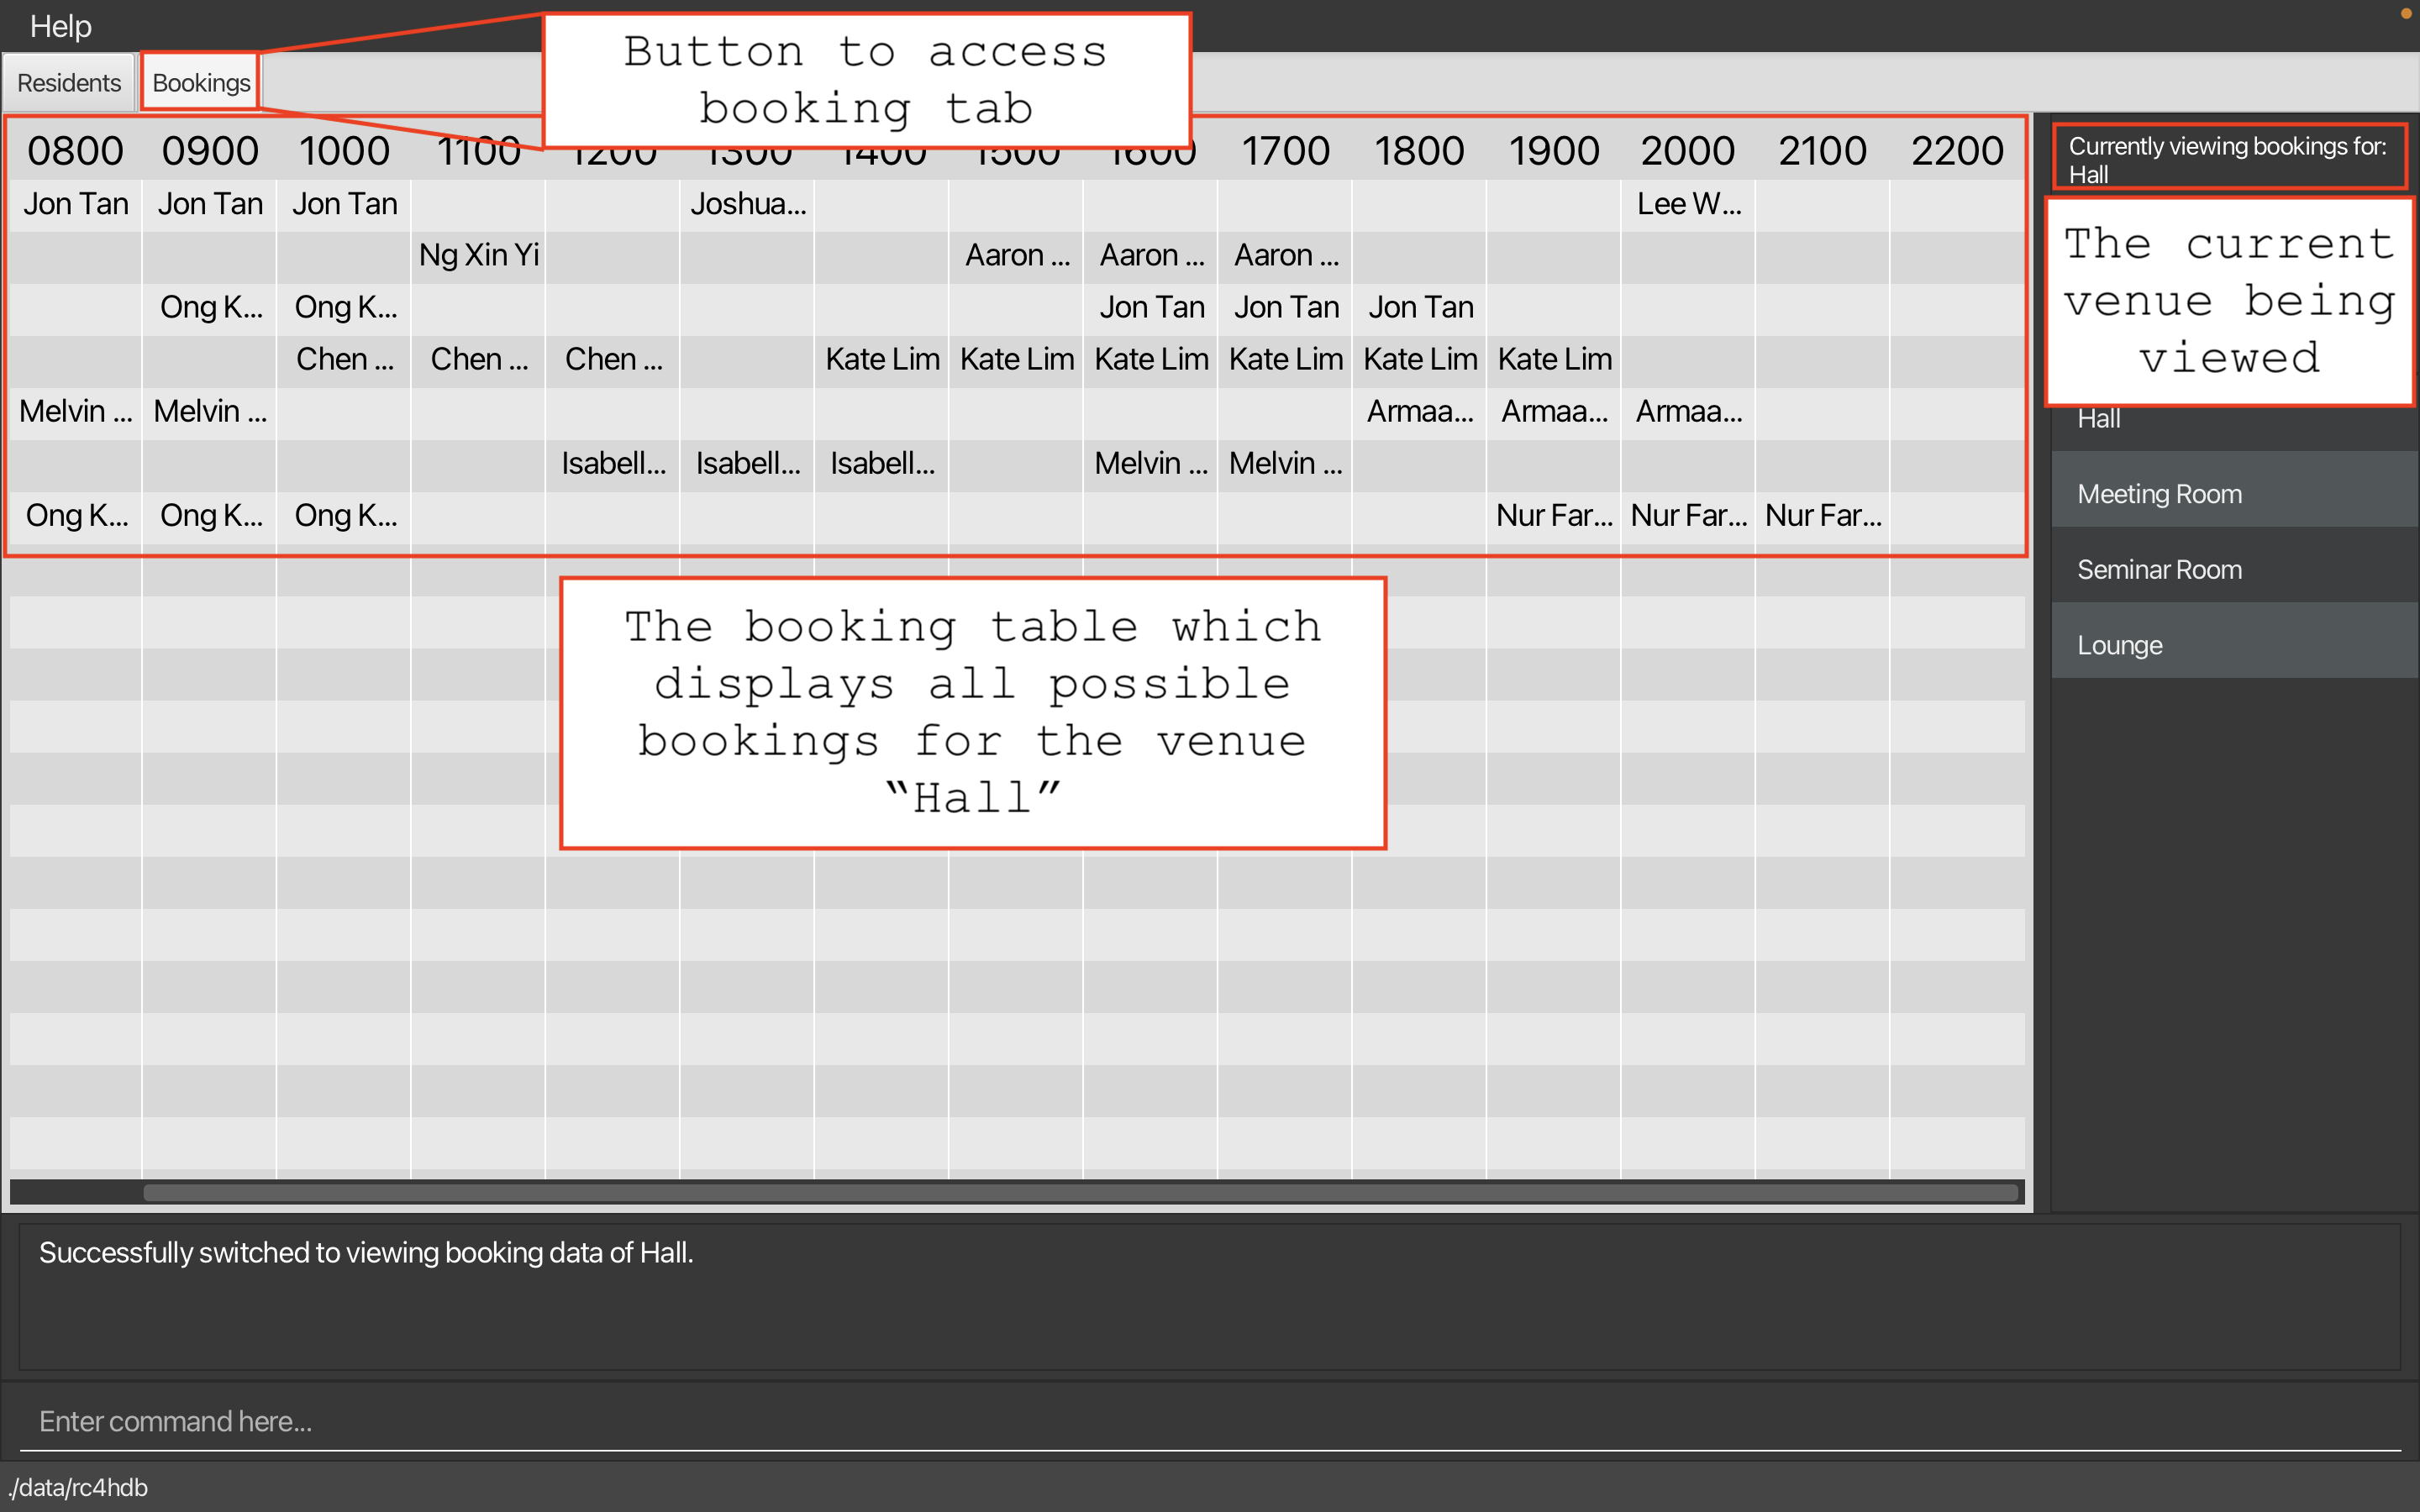
As you perform the booking commands, the table will automatically update to reflect the changes you have made.
venue view VENUE_NAME command to switch manually.
Adding a venue : venue add
Adds a venue to the database.
Format: venue add VENUE_NAME
Examples:
-
venue add Meeting Room 3adds a venue calledMeeting Room 3. -
venue add Multi-purpose Halladds a venue calledMulti-purpose Hall.
Deleting a venue : venue delete
Deletes a venue from the database.
Format: venue delete VENUE_NAME
Examples:
-
venue delete Meeting Roomdeletes a venue calledMeeting Room. -
venue delete Halldeletes a venue calledHall.
Viewing a venue : venue view
Displays all bookings for the specified venue.
Format: venue view VENUE_NAME
Examples:
-
venue view Meeting Roomswitches the current list of bookings displayed to the ones inMeeting Room. -
venue view Hallswitches the current list of bookings displayed to the ones inHall.
Adding a booking: venue book
Adds a booking to the specified venue, at the given time period and day.
Format: venue book INDEX v/VENUE_NAME tp/TIME_PERIOD d/DAY
- Adds a booking under the resident specified at
INDEX, at the specifiedVENUE_NAME,TIME_PERIODandDAY. - The index refers to the index number shown in the displayed residents list.
- The index must be a positive integer 1, 2, 3, …
Examples:
-
venue book 2 v/Meeting Room tp/8-9 d/TUEbooks the Meeting Room from 8am to 9am on Tuesday. -
venue book 1 v/Hall tp/13-14 d/WEDbooks the Hall from 1pm to 2pm on Wednesday.
Deleting a booking: venue unbook
Deletes a booking from the specified venue, at the given time period and day.
Format: venue unbook v/VENUE_NAME tp/TIME_PERIOD d/DAY
Examples:
-
venue unbook v/Meeting Room tp/8-9 d/TUEdeletes the 8am to 9am Meeting Room booking on Tuseday. -
venue unbook v/Hall tp/13-18 d/WEDdeletes the 1pm to 6pm Hall booking n Wednesday.
Format for Venue fields
v/VENUE_NAME
- The name displayed for the venue will be the exactly identical to the one specified in
VENUE_NAME. - Can contain alphanumeric characters and whitespaces i.e.
m 3 3 t i n g r o o mis valid. - Case-insensitive i.e. venues
Meeting Roomandmeeting roomare identical.
tp/TIME_PERIOD
- The start time and end time must be separated by a hyphen i.e. 8 to 9 must be indicated as
8-9. - Must begin and end on the hour i.e.
1230-13will not be accepted. - Operates on a 24-hour format i.e.
4p.m.must be indicated as16. - Valid booking hours are from
8to23. - Blocks of time are allowed i.e.
18-21is accepted. - The start time must be earlier than end time.
d/DAY
- Must be the first three characters of a day i.e. Monday must be indicated as mon.
- Case-insensitive i.e. tUe, TUE, tue are all valid.
Quality-Of-Life
As an application optimized for keyboard usage, RC4HDB may not be the most intuitive for someone that is used to using the mouse. As such, we have provided several simple Quality-of-life features that we hope can improve your experience of using RC4HDB.
Keyboard shortcuts
To encourage keyboard usage, here are several keyboard shortcuts that you may find useful for your use:
| Key | Functionality |
|---|---|
Esc |
Closes the Help Window if it’s open |
F1 |
Opens the Help Window if it’s not open |
F2 |
Highlights the first row of the displayed list |
F3 |
Quick-access to the command input box |
Ctrl+Tab |
Switch between Resident and Booking tabs |
This feature is especially useful if you want to refer to our Help Window which contains a summary of our most basic commands. If you want a full summary of all our commands, refer to here.
Accessing command history
Use the ↑ Up and ↓ Down arrow keys to navigate through the command history. This
is useful if your next command is similar to a previous command, or if you wish to revisit
your previous commands.
Exiting the Program
You do not have to worry about exiting RC4HDB without saving as any changes you’ve made is automatically saved after every command. For more information, visit the section on saving your data.
Exiting the program : exit
Exits the program.
Format: exit
Upcoming Features
This section lists some of our upcoming features that we are excited to bring to you!
Exporting to CSV file : file export
As important as it is to be able to import files, we also understand that you might have the need to export them.
RC4HDB will soon provide users with the ability to export data to .csv files.
The file will be safe to remove from the [JAR file location]/data folder.
Format: file export FILE_NAME
Examples:
-
file export residentswill export the data fromresidents.jsonfile into a.csvfile namedresidents.csv.
More coming soon!
FAQ
Q: I type very slowly, is RC4HDB any good for me?
A: You do not have to be fast at typing for RC4HDB to improve your workflow!
Q: I have accidentally deleted an entry, is there any way for me to undo it?
A: Currently, we do not offer such an option, but you can look forward to RC4HDB v1.5, as we will be implementing that in the near future!
Q: The text on the screen is too small, is there any way for me to resize it?
A: RC4HDB does not allow the text size to be changed, however, you can enlarge the text by changing your screen resolution. You may refer to this link for Windows, and this link for Mac.
Q: Do I need an internet connection to be able to use RC4HDB?
A: You do not need an internet connection to use RC4HDB as everything is done on your device.
Q: Can I search using fields other than the name?
A: You can use the filter command to search for people using the other fields.
Q: Why is there a need to use hideonly if we can already use showonly?
A: You can use hideonly when you want to display more fields than you want to hide. For example,
hideonly i has the same effect as showonly n p e r g h m t on a full table. Using hideonly helps to save
time on typing!
Q: How do I remember which commands use letters (as compared to other commands which use key/value) as inputs?
A: Only the column hiding features, i.e. showonly and hideonly, use letters. You can remember this by
associating the “only” in these commands to the convenience of typing only letters!
Q: The section for showonly and hideonly says that i n p e r g h m t are valid letters. However, I am getting an error message that says “Please enter columns to show or hide that are currently in the table view.” when using these valid letters.
A: i n p e r g h m t are indeed valid letters. Recall that showonly and hideonly only work on columns that are currently shown in the table view.
This means that for showonly n p e and hideonly n p e to work, the name, phone, and email columns must
be present in the current table. The error message mentioned above means that the specified columns are
not fully present in the table. Please make sure to only enter letters corresponding to the columns you see on your
screen when typing these commands.
Q: How can I resize the columns in the table?
A: Column resizing can be done the same way as they do in Excel. However, we only allow the resizing of the Name and Email columns.
They other have a fixed size to allow for your ease of viewing. Alternatively, you could also use the showonly and hideonly commands if you
do not wish to see them.
Q: I can not find the information that I need in the User Guide, who can I contact?
A: You can drop us an email at nseah21@gmail.com .
Glossary of terms
Field
This term refers to information that represents some (common) property in a dataset.
For example:
-
In a rental bicycle sharing dataset, one possible field is the type of each rental bicycle.
-
In a population demographic dataset, one possible field is the age of each individual.
CSV
This term is short for Comma-separated values. It is a common file type that can be identified through the .csv after a file’s name.
JSON
This term is short for JavaScript Object Notation. It is a common file type that can be identified through the .json after a file’s name.
Authors
This User Guide was co-written by Alvin, Jordan, Neale, Nicholas, and Naren, the developers behind RC4HDB. For more information, please refer to our about us page.
Command summary
We understand that you might be overwhelmed by the number of commands available to you. Though we have provided a summary table of contents in the Help Window in RC4HDB, that table contains only our most basic and commonly used commands. The tables below contain the full summary of our commands and how they can be used.
General Commands
| Action | Format, Examples |
|---|---|
| Help | help |
| Exit | exit |
Modifying Resident Commands
| Action | Format, Examples |
|---|---|
| Add |
add n/NAME p/PHONE_NUMBER e/EMAIL r/FLOOR-UNIT g/GENDER h/HOUSE m/MATRIC_NUMBER [t/TAG]… e.g. add n/James Ho p/22224444 e/jamesho@example.com r/2-1 g/M h/D m/A9876543B
|
| Edit |
edit INDEX [n/NAME] [p/PHONE_NUMBER] [e/EMAIL] [r/FLOOR-UNIT] [g/GENDER] [h/HOUSE] [m/MATRIC_NUMBER] [t/TAG]…e.g. edit 2 n/James Lee e/jameslee@example.com
|
| Delete |
delete INDEXe.g. delete 3
|
| Remove |
remove [/SPECIFIER] KEY/VALUE [ADDITIONAL_KEYS/ADDITIONAL_VALUES]e.g. remove /all h/D g/M
|
| Clear | clear |
Viewing Resident Commands
| Action | Format, Examples |
|---|---|
| List | list |
| Show only |
showonly LETTER [MORE_LETTERS]e.g. showonly n p e t
|
| Hide only |
hideonly LETTER [MORE_LETTERS]e.g. hideonly i r g h m
|
| Reset | reset |
| Find |
find KEYWORD [MORE_KEYWORDS]e.g. find James Jake
|
| Filter |
filter /specifier KEY:VALUE [ADDITIONAL_KEYS:ADDITIONAL_VALUES] e.g. filter /all h/D g/M
|
File Management Commands
| Action | Format, Examples |
|---|---|
| Create File |
file create FOLDER_NAME e.g. file create rc4_data_2022
|
| Delete File |
file delete FOLDER_NAME e.g. file delete rc4_data_2022
|
| Switch File |
file switch FOLDER_NAME e.g. file switch rc4_data_2022
|
| Import File |
file import FILE_NAME e.g. file import students
|
Venue Booking Commands
| Action | Format, Examples |
|---|---|
| Add Venue |
venue add VENUE_NAME e.g. venue add Meeting Room 3
|
| Delete Venue |
venue delete VENUE_NAME e.g. venue delete Hall
|
| View Venue |
venue view VENUE_NAME e.g. venue view Hall
|
| Book Venue |
venue book INDEX v/VENUE_NAME tp/TIME_PERIOD d/DAY e.g. venue book 2 v/Meeting Room tp/8-9 d/TUE
|
| Unbook Venue |
venue unbook v/VENUE_NAME tp/TIME_PERIOD d/DAY e.g. venue unbook v/Meeting Room tp/8-9 d/TUE
|